Now that I am finally free from exams and have completed second year of University, I can take the time to sit down and blog without feeling guilty! I’ve been looking to expand my looks, but at the moment I really only have one trusty palette (student life means I can’t buy all the make-up I’m dying to get). Buuuuut, I will hopefully be purchasing some more colourful palettes soon so I can try out fun looks for summer! For now, I’m sticking to my Morphe 35O and staple Make-Up geek shadows (I know, I use the same shadows in basically every look, I’m getting bored too).
I also decided to try and get back to step-by-step tutorials so it’s easier to follow!! Still getting to grips with angles and still not the best at make-up but practice is key!
Hope you enjoy!
Love, Chloe.

Step 1: I highly recommend doing your eye-makeup first when using the Morphe 35O palette or any palette that has fall out. Throughout the look you will see a lot of the eyeshadows had some fallout which I then cleaned up later. I did my brows as I usually would and carve them out like normal. Tutorial on how I do my brows is here: https://prettyfacesandmanyplaces.wordpress.com/2017/01/28/simple-brow-routine/

Step 2: I took the yellow-orange shade from the palette (shown as 1 in the image) and buffed this into my crease from outer to inner corner using the Morphe E23 brush. I’m using this as my initial transition shade which will allow better blending of the other shadows.
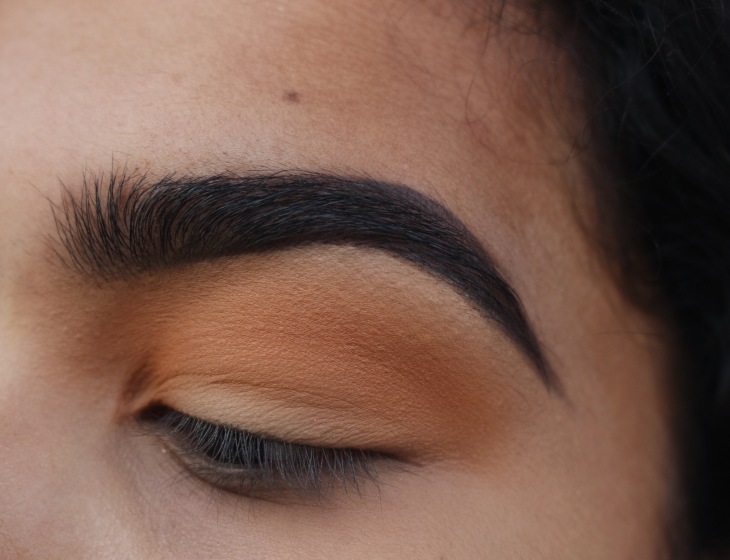
Step 3: Taking the pale orange shade (shown as 2 in the image) I used a Morphe M441 to again buff this shadow into the crease from outer to inner corner, only slightly lower than the initial transition.

Step 4: Using a Morphe M506 brush, I took a mixture of the orange/red shades (shown as 3 and 4 in the image) and packed these onto the lid, concentrating the shadow on the outer and inner part of the lid, leaving the centre slightly blank. I then took the M441 brush and blended them to make sure there were no harsh lines.

Step 5: I took a small amount of Make-up Geek ‘Cocoa Bear’ shadow on the outer and inner lid using the same brushes in step 4. I didn’t want to add too many deep colours as I wanted the make-up to be very bright and summery. From then, I took Mac Nylon shadow in the centre and blended out the edges with whatever shadow was left on the M441 brush. I continued to add colour and blend until I got my desired look. The centre lid colour wasn’t as bright as I had hoped but I still liked the outcome.

Step 6: I took my NYC liquid liner and did a wing. I then cleaned the fall-out with a make-up wipe before using concealer to sharpen the edge of the wing as well as creating a blank canvas for my lower lash line shadows.

Step 7: Finally, I added mascara (you can also add false lashes if you wish) and used the same eyeshadows as before on the lower lash line!


oh my god I love every single shade of this palette! it looks amazing!
LikeLiked by 1 person
It’s a great palette! Definitely worth a purchase!
LikeLiked by 1 person
Love!! ❤️
LikeLiked by 1 person
Thank you!!❤️
LikeLike
Super pretty look! Great post x
LikeLiked by 1 person
thanks a lot!!😊Xx
LikeLiked by 1 person
Love the look 😘😘! I have this palette and I absolutely love it 😘😘
LikeLiked by 1 person
Thank you so much!! It’s amazing isn’t it !! 😘😘
LikeLiked by 1 person
It is 😍
LikeLike